Saturday 26 April 2014

Unit 4 Fine Art Multiple Images - Photo shoot and working with Photoshop

Carrying on with the Multiple Image theme, my good friend Gemma, (who has helped with my AS and A2 Media Studies and now again with my A2 unit 4 Fine Art) agreed to be my model for a practise photo shoot. :).

I borrowed a Canon camera and tripod from college and using my living room as the studio, I made Gemma move and pose around the room, many MANY times - she was so patient :). The following are just a few of the hundreds of shots taken today.

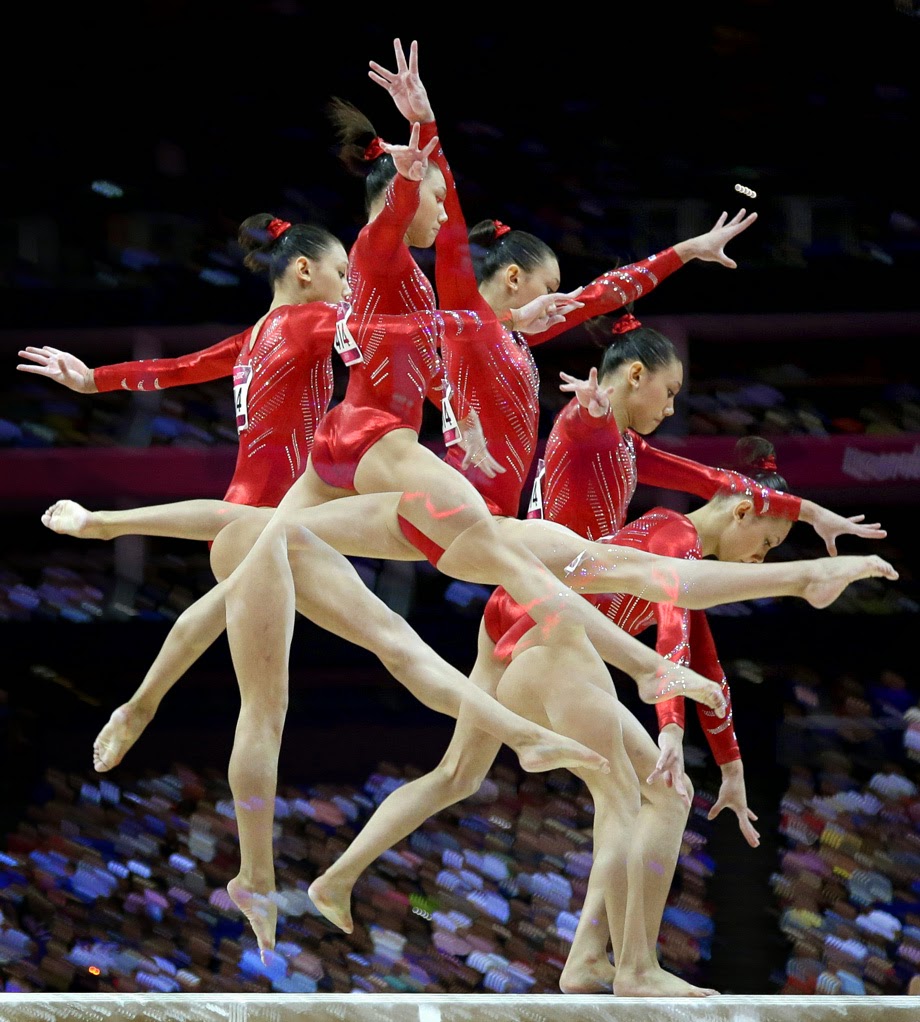
First of all I wanted to experiment and recreate an Edweard Muybridge movement multiple image - trying saying that several times..........:)

Here's an example of his work taken from the internet:-


Muybridge was the first photographer to capture movement - he used several camera's in a line, set to capture each individual image as his subjects passed by. Muybridge was considered the inspirer of the first moving 'movie' films.

As I didn't have a large studio, to help me capture movement, poor Gemma was set the task of rolling about my living room floor.  Fortunately today it's a lot easier to capture movement using the camera 'fast shutter speed', sort of like Muybridges line camera's in one.

Anyway, back to Gemma:-


I managed to capture this simple line of movement, when the images were cropped and placed together using 'Paint' I ended up with the following...


To create my Edweard Muybridge vintage photograph I used an 'App' that I'd found on my iPhone.

Next I wanted to create a more modern multiple exposure image, similar to those I had found when researching on the internet.  This is one example:-


 I took several shots of Gemma seated on the couch and chair, walking into the room and sitting on the carpet.


Then using the Photoshop layering technique, I managed to put all my Gemma's together in the room.

Multiple Gemma's
Then I wanted to create another multiple exposure shot of Gemma, but this time blending her together, similar to this image taken from the internet:-


This time I had Gemma sit crossed legged in the middle of the floor, where she simply stretched over her arms, one after the other.


When layered together using Photoshop - I was really impressed with the final result :) :)

At first I named this 'Gymnastics Gemma' but changed my mind as she reminded me of an 'Indian Goddess'.
I've been researching a photographer called Christopher Relander.  Using Photoshop he creates such simple but beautiful images by combining one subject, usually a person or animal, together with a flower or plant.

Here's an example of Relander's work:-


This time I used a 'selfie' together with a random tree shot taken outside my college.


Using Photoshop I flipped the tree image upside down, then layered and carefully blended over my 'selfie'.

Cutting out the unwanted background and foreground parts and changing the colour of my head and shoulders to 'black and white', helped to create the following Relander style image.


I'm really happy with this image, it's simple but striking at the same time.


Gemma with Rooftops and Trees


'Selfie' with Flowers.


'Flower Face Gemma'


Monday 21 April 2014

Unit 4 Graphics coursework - Nursery Rhyme Book Cover

Moving on with my Graphics unit 4, I chose 'create my own Nursery Rhyme Book Cover' for my coursework and exam piece.  I picked this topic because I thought there was so much material I could research and develop.

During my research I discovered the creative differences between old and modern book covers, recreated my own versions of popular Nursery Rhyme characters, 'Humpty Dumpty', 'Lil Bo Peep' etc. and experimented with alternative Nursery Rhyme subjects and backgrounds, rather than just draw them.

Here's some images of my work so far...


This Kate Greenaway illustration inspired my version of  'Lil Bo Peep'.


My 2nd version of 'Lil Bo Peep' was inspired by 'Belle', created by Mandy Sutcliffe.


My Humpty Dumpty Egg was inspired by Quentin Blake's 'Willy Wonka' character.


Next I wanted to create some backgrounds - here's my version of Humpty's wall.  I added acrylic colours and outlined with black fine liner pen for definition.


 Here's another Nursery Rhyme style acrylic and fine liner background, inspired by book illustrations and children's television shows.


After experimenting with several hand drawn background scenes, I wanted to create my 'stock image', illustrations which could be re-used and added to many Nursery Rhyme book cover experiments.


I love foxes :), so decided to draw my own version - I named him 'James'.  I hand drew James then scanned and coloured in with additional shade and tone, using Photoshop software.


My insects and bugs are inspired by other versions found during my research.  Here again I've hand drawn, scanned and then improved using Photoshop.

 I love my moon and stars illustration, I may use this a my Nursery Rhyme book publisher's logo...


Decided to create a 'stock image' background scene for later use, together with my Lil Bo Peep and other stock images...


Playing with more stock images.  I added colour using acrylic paint, black fine liner and white sharpie pen.


Here I decided to scan different textures into the computer, i.e. scrunched tissue and blue acrylic pattern and fluffy woollen pillow, to make my sky and sheep.  The using my own photographs I cropped, enlarged and enhanced leaves and bark for my trees and bushes and grass for my hills.  I wanted to make my Kate Greenaway inspired Lil Bo Peep look more professional, so I scanned my original illustration and added colour, shade and tone using Photoshop software.  I'm quite pleased with the end result - I think it's unusual, colourful and a little different to what you usually find on and in a Nursery Rhyme book.


Inspired by the vegetable puppets used in CBeebies television programme - Mr Bloom's Nursery.


 I wanted to experiment and develop my own nursery rhyme characters using other foodstuffs - fruit and obviously an egg for Humpty Dumpty.

Here's my foodstuff's photo shoot...


Here's some photo's of my friend and model - Gemma, posing as if she's holding and looking at one of my nursery rhyme characters.


Then I drew and Photoshop enhanced some 'stock image' facial feature's and items of clothing.


Here's a couple of examples of what happened when I put my egg and banana photographs together with eyes, legs, arms and a hat using Photoshop....


Sooooooooooo cute.........:)


Here's a rough Photoshop idea of Gemma interacting with my egg character and butterfly.  This gives me an idea for my Graphics unit 4 exam...


A few 'close up's' of Gemma


Again using Photoshop put them together with my fruit photo's...

My own version of the 'Annoying Orange'

Some scary looking Blueberries :)

And finally, inspired by my fruit faces, I realised that nursery rhymes usually include lots of flowers, so I wanted to see what would happen when I photo-shopped Gemma's face onto one of my flower images...
Can't make my mind up about this - might not be suitable for a Nursery Rhyme book cover - too scary for kids :):):)...